Saturday, January 28, 2012

New Year New Food

With the start of the new year, I have been extremely busy.  I haven't been blogging about our food as much as I would have hoped. That's not to say Megan and I aren't eating well, because we certainly are! 

Megan has been a huge help lately. I have been working and staying in my office longer and not coming home until later in the night. This is mainly due to my dissertation that I am writing that is summing up my research over the past two years. I am on schedule, and just finished the first chapter of it, only 34 pages long! There's plenty of more writing to do (four chapters to be exact), but I am super grateful to have Megan's loving support. Not to mention she KILLED her HESI exam!!!

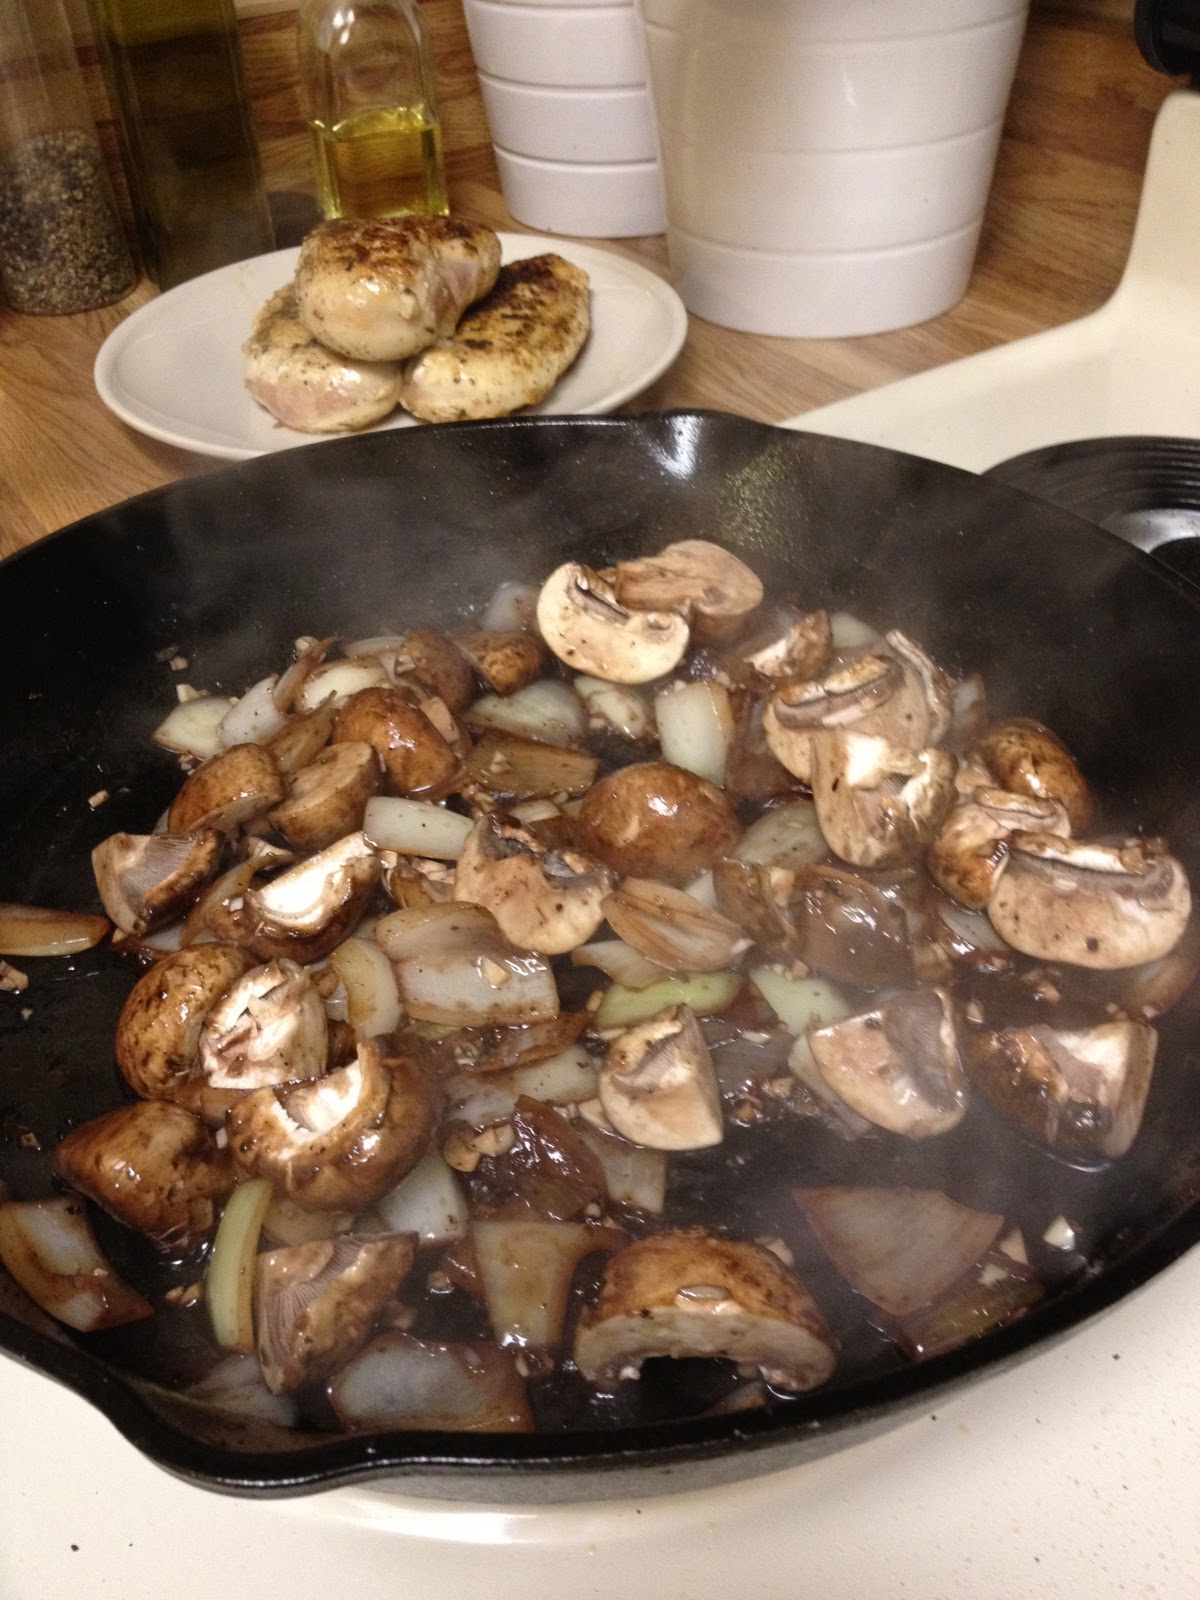
Here's a dinner we prepared together last week. Once again, it features my loving cast iron skillet. Megan started by preparing the vegetables. Some canned diced tomatoes, baby portabella mushrooms, onions and garlic. 


In the meantime, I seasoned some chicken breasts with salt, pepper, and Paul Prudhomme's Poultry Magic (amazing). I seared the breasts in a hot cast iron skillet to give them a nice crust.


As you can see I only seared the breasts, the center is still very rare. I removed the breasts from the skillet and seared the onions.


And then... red wine, of course. This is Three Wishes Cabernet Sauvignon.


After a generous amount of wine, I scrapped the bottom of the pan and let the wine cook a little bit.


Then I added the mushrooms and garlic.


Cooked those down a little bit..


Then added the canned tomatoes and some dried herbs: italian seasoning and extra oregano.


Put the breasts back in and covered them with the veggie mixture.


Popped it in the oven.


Twenty minutes later, the apartment smelled amazing as I took the skillet out of the oven.


While the chicken was baking, we cooked some corkscrew shaped pasta.


And served the chicken on top of the pasta.


The corkscrew shaped pasta was perfect for this meal, probably because of its large density of pasta per its small size. I don't think the meal would have been the same with a thinner pasta such as a spaghetti or linguine. So... have you taken my advice and bought a cast iron skillet yet? If not, it's seriously about time you do.

Thursday, January 12, 2012

Ragin' Cajun

As many of you may know, my parents spent the last 2+ years in New Orleans, Louisiana. Recently, I spent the holiday break with them during their last days in New Orleans. On January 2nd, my dad and I finished packing up the moving truck and we headed back to Florida. However, I left with a couple of souvenirs. The first is Tony Chachere's Creole seasoning.


This seasoning is awesome, I put it basically on everything. You will have to wait for future blog posts to see the rest of the souvenirs, this is the star of this post.

Yesterday I took my PCAT, and now am awaiting anxiously to hear back from Pharmacy schools. Also today, I started to write my undergraduate dissertation which I will submit at the end of the semester in partial fulfillment to graduate with honors. My dissertation with encompass my experimental research over the past two years in organic electronics: light-emitting diodes and solar cells. The stack of books on my desk in my office seems to keep growing.


Back to the cajun talk. I have made it a task to utilize each "souvenir" I brought back from New Orleans in a dish to make it stand out on its own. So for this dinner, I started by cooking some linguine.


Then I cut up some boneless skinless chicken breasts into bite-size pieces. 


And then minced some onions and garlic.


And some tomatoes.


I started off by cooking the chicken in a cast iron skillet with a generous amount of the aforementioned Creole seasoning.


I set the chicken aside and cooked the garlic and onions.


OH! Here's another souvenir I forgot to mention, though it's not really unique to New Orleans. While I was in New Orleans, there is a wonderful Whole Foods near where my parents were staying. My mom received an email from Whole Foods about a wine deal that was only good for one day. The deal was a case of "Three Wishes" wine for $24. Yes, that's $2 a bottle. I grabbed one Chardonnay, one Merlot, and four Cabernet Sauvignon. My mom chose six wines for herself to complete the case.


Back to the cooking. I deglazed the skillet with the Three Wishes Chardonnay and then added the fresh tomatoes.


After cooking some of the wine out I added some half&half and a tad more Creole seasoning. 


After simmering the sauce for a while, I added the chicken back to the party to heat up.


My cast iron skillet wasn't big enough for the pasta, so I combined the pasta and the sauce in the stockpot.


Once it was nice and warm, I topped it with some parmesan cheese and commenced eating. 


This meal was awesome, not to mention quite spicy! For a little side note: if you don't have a cast iron skillet, you must buy one NOW. I picked up mine, a 12" Lodge pre-seasoned cast iron skillet with a mitt for the handle for $15 on Amazon. Probably my best kitchen purchase ever. The cast iron skillet can literally be used for anything, and it will never wear out. 

Sunday, January 1, 2012

Dessert Hacks

Never neat, Lifehacker offers a tip on baking cupcakes without a disposable cup. Enjoy!


Saturday, November 5, 2011

Stranger

I've been quite the stranger with blogging lately. I've been really busy between my classes, trying to finish up my experiments before the end of the year, my PCAT prep course starting today, starting to work on my dissertation, and in the meantime still being a good boyfriend! Blogging is good for me, it really gets my mind off things and gives me a nice way to relax. 

So this blog is about a meal I made a few days ago. A few days before that, I had a lot of work to do and Megan offered to make dinner for me (it was a delicious asian pasta, you should bug her to blog about it:)). So 2 days after she made that delicious meal, I wanted to do the same for her. Unfortunately, I don't have any pictures to accompany this post as the meal was made up on the spot and I completely winged it. I didn't really know if the meal was going to come out, I was hoping for the best! 

I started off by heating my cast iron skillet to medium high (which is VERY hot on our stove). While the cast iron was heating up, I seasoned 2 very large chicken breasts (they were quite thick) with some salt, pepper, and Paul Prudhomme's Poultry Magic (my favorite thing to season chicken with). Once the skillet was very hot, I added a touch of oil and seared the chicken breasts. Once I got a nice crust on one side, I flipped the breasts and threw in a package of baby portabella mushrooms into the skillet; whole, not sliced. After the other side of the breasts got a good sear, the breasts were nice and golden on the outside, but very raw on the inside. I added a jar of Bertoli pasta sauce (I think it was tomato and sweet basil). I stirred the sauce around a bit to coat the mushrooms and the chicken and put the cast iron into the oven. After about 20-25 minutes on 400 F, I sprinkled some mozzarella and parmesan cheese on top of the chicken breasts and let the cheese melt for a few minutes back in the oven.

I served the chicken and mushrooms with mashed potatoes. That's right, I made mashed potatoes, I didn't keep them plain this time. Here's the reason. Idaho potatoes are constantly going on sale now so that's what I've been buying lately. However, when these potatoes are boiled they tend to fall apart and get mushy, it's very aggravating. So, to aleve this, after draining the potatoes I added some milk, heavy cream and butter and mashed them up. 

 Surprisingly, the meal came out amazing! I was really pleased with how everything came out. I recommend that if you make this, to keep the baby bella's whole as I did. They cooked throughout and didn't need to be sliced when eating because they're bit size. When you bit into them you get a pop of warm juicy mushroom. I can't wait to make this again! 

Saturday, October 22, 2011

Most Difficult Thing I've Made

Earlier this week I went out on a limb. I wanted to make one of my childhood favorite snacks; the soft pretzel. Typically, they are purchased at the grocery store in the frozen section and you quickly toss them in the microwave and snack on. They're also available at amusement parks, sports stadiums, and in just about every mall. But how do you make them? It's a bit more complicated than it seems. I started out by activating some yeast in some warm water.


Once the yeast was activated, I added some brown sugar.


Some vanilla.


A touch of salt.


And then some flour. This was challenging for me as I was slowly adding more and more flour. This being my first time making a pretzel dough, I had no idea how the consistency was supposed to be. I just kept adding flour until the dough pulled away from the bowl. But it continued to be super sticky.


Then I let the dough sit and rise for a while.


Now here's the trick to getting a nice and golden brown pretzel. I brought some water to a boil and added lots of baking soda. Then brought it down to a simmer.


While the water was getting ready, I started to work with the dough. I didn't take any pictures before finishing, because the dough was so sticky and extremely hard to work with. I was almost convinced that the pretzels weren't going to come out. After cutting the dough into equal sized portions, I rolled the dough and formed the classic pretzel shape we recognize. 


Then, the pretzels took a dip in the simmering baking soda water.


Once all the pretzels received their baking soda bath they were ready for the oven.


They came out of the oven nice a golden brown.


They pretzels didn't come out perfect, but they tasted quite good. I learned some things to make these pretzels better the next time I make them. The pretzels should go into the baking soda bath on both sides and for an optimized amount of time (which I don't know exactly yet). I needed to roll out the dough a lot thinner, but the dough for some reason didn't want to give up its shape. It was a very elastic type dough. Also, I need to work on perfecting the dough recipe and figure out correct proportions. With that being said, the pretzels really did come out better than expected. Megan and I really enjoyed them and thought they tasted great. I read online that the pretzels don't keep too long after being baked. So instead of risking it, we froze them. Today I heated up one of them that I froze, and honestly I think it tasted better than the day I baked them! So what's the most difficult thing you've ever made?

Thursday, October 20, 2011

A "New" Toy

Before Megan and I moved in together at the start of the fall semester, we started to make lists of things we'd need for our new apartment, way ahead of time. One of the most important things was a coffee maker. Being obsessed with KitchenAid, I wanted HAD to have one of their coffee makers. Unfortunately, when I started to research them, they were quite pricey. We're talking $100+. Luckily, I was able to find a discontinued model on KitchenAid's website, and bought it brand new for $50. 


This was a great buy. The coffee maker had a 14-cup glass carafe, an automatic brew setting, a special setting that is optimized for 1-4 cup brews, 30 minute intervals to show how long the coffee has been sitting since it's been brewed, and a filter inside the section you add water to. And not to mention, aesthetically pleasing (it's KitchenAid after all). This coffee maker was working wonderfully, we would set the coffee to start brewing at 6:15am every morning so we woke up to the smell of fresh coffee. However, last week we woke up to discover the pot was empty; the coffee did not brew. There was an error message displaying on the screen. Megan researched the error and found out it was indicating a failure in the electronics of the system. So we did a reset and the problem persisted. I contacted KitchenAid and told them about the problem, and in no time they staff member said they will send me a replacement for free. All I had to do was pack my old coffee maker into the box the new one came in and send it out with a prepaid shipping label. I was thrilled, it was so easy to get a replacement (I partially think this is because I purchased it directly from KitchenAid). After the staff member looked up my order, she delivered some good news. She said that they don't make the model coffee maker I have anymore. So instead they're shipping me their newest model, which currently retails for $130. I was even more thrilled!

Today it arrived.


I requested the same color, onyx black, so that it matches our blender. This new coffee maker has all the same great features I mentioned above, but has a few new updated tweaks. First off, the display screen is 10x better, and it much more interactive than the previous model. Also, the display has blue colored LED's and is easier to look at than the red from before. Also, this model also shows how long it has been since the coffee has brewed, but instead of telling me it's been 30, 60, 90, or 120 minutes, it tells me the EXACT time. Also, instead of a flip top to put the coffee filter/coffee, the front stainless steel panel where it says KitchenAid opens and you pull out the insert to put in the filter and coffee. And finally, a BIG improvement which I'm stoked about, is a de-attachable water container (with filter as before). This makes it SO easier to add water to the system so you don't have to fill the carafe then pour it in the container spilling it all over the counter.


So here it is all unpacked.


I'm really thrilled about this. I paid $50 for an EXCELLENT coffee maker, and it worked wonders for over 3 months. Now I received a $130 coffee maker for FREE, and am very excited about it. Not to mention this coffee maker comes with a one year warranty as the other coffee maker, but the warranty starts today! How do you like your coffee prepared? 

Wednesday, October 19, 2011

Fresh Herbs

Megan and I have been talking about gardening for forever now. However, we keep talking about it, but never got around to actually doing it! While at Publix yesterday, we wanted to pick up some basil for our pizzas we plan to make this weekend. After realizing a small little package of basil runs $3-4 at Publix we wanted to take a stand. Rant: That's outrageous for a little package of basil, that if we don't fully consume will go bad in no time! So instead, about 5 feet from the packaged herbs at Publix was a display stand with already planted herbs! We bought a little basil plant for $2; note: this was cheaper than the packaged basil and was actually bigger.

This morning we woke up at 5:30am (well Megan did, I didn't drag out of bed until 6:10am), and I drove Megan to her clinical's at the VA Hospital. I dropped her off around 6:45am and then while on the way home I took a detour and stopped at Lowes. The reason for going to Lowest was actually to see what time they open so that I could come back later. But, I was pleasantly surprised; they open at 6am! I went in and walked around (admiring the gorgeous KitchenAid double oven and range and refrigerator). Finally I made my way to the gardening section and found some organic garden soil, a cute little pot with a saucer, and a small hand shovel. 


I came home and got to planting!


Say hello to our new basil plant! After planting, I was about to throw the bag away that my pot and shovel were in but noticed a card stuffed in it. Normally, I throw these kinds of these away, but I decided to take a look at it. Low and behold it was an advertisement for an open house at Lowes for kickstarting your very own kitchen project.


I think it's a calling.

This is just a start to our gardening adventures. We hope to expand our horizons to various herbs, and possibly vegetables! So what are you growing in your garden? If nothing, why aren't you?!